![]() Fri Sep 21, 2007 9:12 pm
Fri Sep 21, 2007 9:12 pm
[Tutorial] Ultimate Starters/Newbies Guide
The purpose of this guide is to provide someone with zero knowledge of the PSP homebrew scene a step by step set of instructions to easily get their PSP running homebrew and custom firmware. The steps located below are listed in chronological order and should be followed as numbered.
Contents
1. Downgraders
2. Custom Firmware
3. Homebrew
4. ISO/CSO
Downgraders
The purpose of a downgrader is to bring you from your current firmware to 1.50 firmware. Why do we need to be at 1.50 you ask… well, 1.50 is the only original firmware capable of operating homebrew which allows us to update to custom firmware. Listed below are links to downgrader tutorials, pick one that applies to your current firmware.
2.71
2.71 (TA-082)
2.80
3.03
3.11
3.50
Pandora’s Battery (Unbricker/Universal Downgrader)
Custom Firmware
First of all so you understand a little better, firmware is basically the operating system of your PSP. While custom firmware is a combination of both 1.50 firmware as well as whichever firmware you choose to upgrade to. The purpose of custom firmware is to allow its users to still be able to access the homebrew goodies that 1.50 provides as well as keeping their feet wet in the most recent firmware updates. Listed below are the more highly recommended custom firmwares.
3.03 OE-C
3.40 OE-A
3.52 M33-4
3.71 M33
4.01 M33-2 with 1.50 kernel addon
Homebrew
Homebrew are applications brewed up by various developers on the psp scene. They range from alarm clocks to remote controls to flashers. Whatever your interested in, I’m sure you’ll find a homebrew application to tickle your fancy. To install homebrew applications, follow the steps below.
Tools Needed
1.Usb Cable
2.PSP
3.Winzip or Winrar
4.Memory Stick
5.Computer
Instructions
Step 1
Attach your USB cable to your computer and PSP, then enter USB connection on your PSP screen.
Step 2
Create a GAME150 folder on your memory stick in the PSP folder.
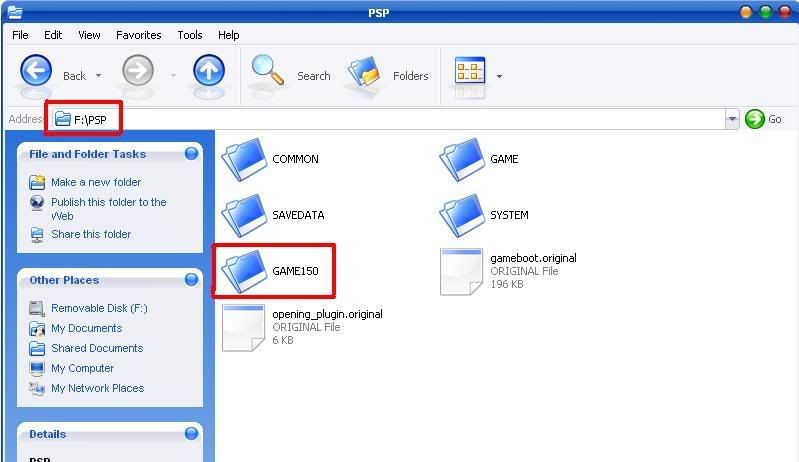
Step 3
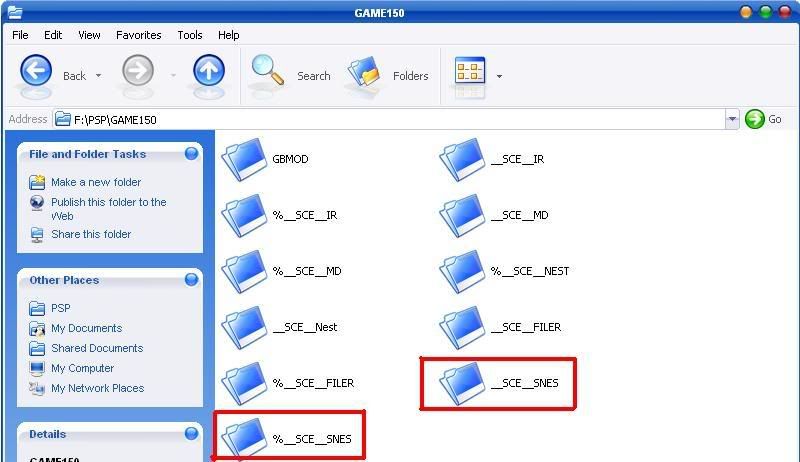
Inside your GAME150 folder you will place your emulators or homebrew applications. The emulators usually come with a regular folder and a folder with %, they will both be placed in the GAME150. Picture below…
Step 4
Scroll to Game > Memory Stick, Push X and your homebrew applications will be displayed if you have followed each step correctly.
Note: Make sure you have a UMD Game or Game Demo inserted in your PSP for your homebrew to run.
ISO/CSO
ISO and CSO files are games that you can run straight from your memory stick. This is a great way to test out a game for free before purchasing it. To install ISO and CSO files, follow the steps below…
Tools Needed
1. Usb Cable
2. PSP
3. Winzip or Winrar
4. Memory Stick
5. Computer
Instructions
Step 1
Attach your USB cable to your computer and PSP, then enter USB connection on your PSP screen.
Step 2
Create an ISO folder in the root of your memory stick.

Step 3
Inside your ISO folder you will place your .ISO and .CSO files. Note: The .ISO and .CSO files usually come in .zip or .rar format. To extract them use winzip or winrar.
Step 4
Press O to exit USB connection.
Step 5
Scroll to Game > Memory Stick, Push X and your games will be displayed if you have followed each step correctly.
Note: Make sure you have a UMD Game or Game Demo inserted in your PSP for your ISO/CSO to run.
Now you should be all set. Enjoy your newly brewed PSP.
For tutorials on more advanced features for your PSP, you may refer to our master guide. Click HERE for it
Contents
1. Downgraders
2. Custom Firmware
3. Homebrew
4. ISO/CSO
Downgraders
The purpose of a downgrader is to bring you from your current firmware to 1.50 firmware. Why do we need to be at 1.50 you ask… well, 1.50 is the only original firmware capable of operating homebrew which allows us to update to custom firmware. Listed below are links to downgrader tutorials, pick one that applies to your current firmware.
2.71
2.71 (TA-082)
2.80
3.03
3.11
3.50
Pandora’s Battery (Unbricker/Universal Downgrader)
Custom Firmware
First of all so you understand a little better, firmware is basically the operating system of your PSP. While custom firmware is a combination of both 1.50 firmware as well as whichever firmware you choose to upgrade to. The purpose of custom firmware is to allow its users to still be able to access the homebrew goodies that 1.50 provides as well as keeping their feet wet in the most recent firmware updates. Listed below are the more highly recommended custom firmwares.
3.03 OE-C
3.40 OE-A
3.52 M33-4
3.71 M33
4.01 M33-2 with 1.50 kernel addon
Homebrew
Homebrew are applications brewed up by various developers on the psp scene. They range from alarm clocks to remote controls to flashers. Whatever your interested in, I’m sure you’ll find a homebrew application to tickle your fancy. To install homebrew applications, follow the steps below.
Tools Needed
1.Usb Cable
2.PSP
3.Winzip or Winrar
4.Memory Stick
5.Computer
Instructions
Step 1
Attach your USB cable to your computer and PSP, then enter USB connection on your PSP screen.
Step 2
Create a GAME150 folder on your memory stick in the PSP folder.
Step 3
Inside your GAME150 folder you will place your emulators or homebrew applications. The emulators usually come with a regular folder and a folder with %, they will both be placed in the GAME150. Picture below…
Step 4
Scroll to Game > Memory Stick, Push X and your homebrew applications will be displayed if you have followed each step correctly.
Note: Make sure you have a UMD Game or Game Demo inserted in your PSP for your homebrew to run.
ISO/CSO
ISO and CSO files are games that you can run straight from your memory stick. This is a great way to test out a game for free before purchasing it. To install ISO and CSO files, follow the steps below…
Tools Needed
1. Usb Cable
2. PSP
3. Winzip or Winrar
4. Memory Stick
5. Computer
Instructions
Step 1
Attach your USB cable to your computer and PSP, then enter USB connection on your PSP screen.
Step 2
Create an ISO folder in the root of your memory stick.
Step 3
Inside your ISO folder you will place your .ISO and .CSO files. Note: The .ISO and .CSO files usually come in .zip or .rar format. To extract them use winzip or winrar.
Step 4
Press O to exit USB connection.
Step 5
Scroll to Game > Memory Stick, Push X and your games will be displayed if you have followed each step correctly.
Note: Make sure you have a UMD Game or Game Demo inserted in your PSP for your ISO/CSO to run.
Now you should be all set. Enjoy your newly brewed PSP.
For tutorials on more advanced features for your PSP, you may refer to our master guide. Click HERE for it
Last edited by staxx on Wed Oct 08, 2008 11:38 pm, edited 11 times in total.